How to Cut and Connect LED Strips Correctly?
LED strips bring light to life in any space. But what happens when your space needs a shorter strip or a custom shape?
Cutting and connecting LED strips sounds tricky at first. Many people worry about ruining their lights or breaking the circuit.
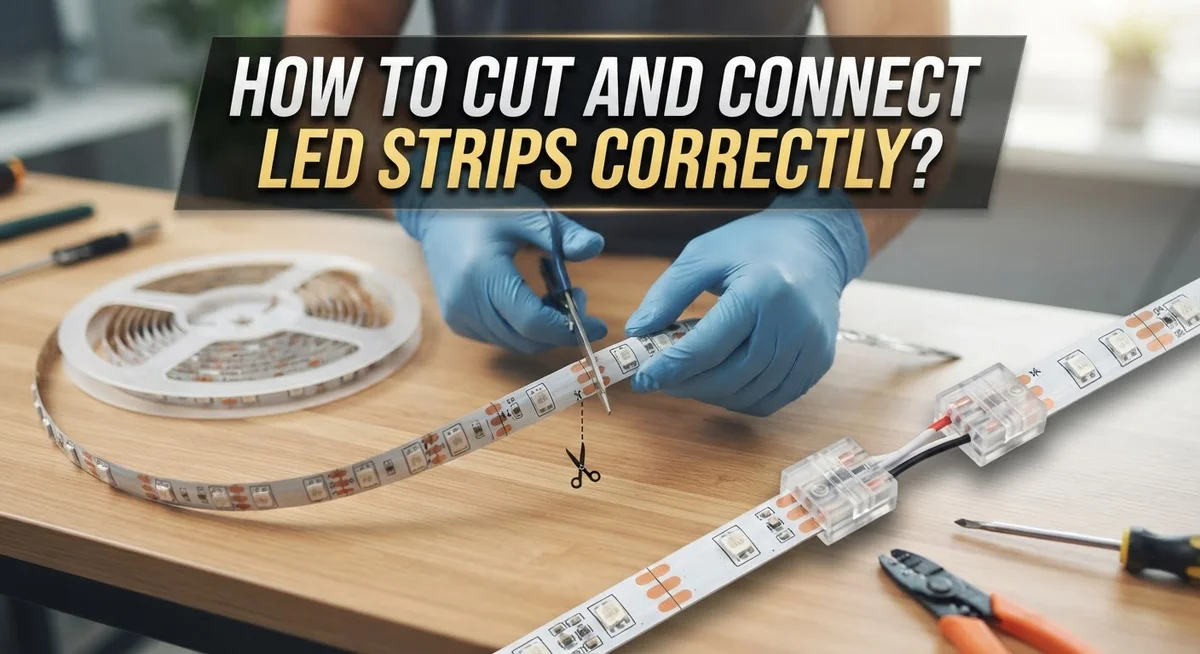
The good news is that it’s simple once you know the basics. LED strips come with marked cut lines. These lines sit directly on copper pads, and they show you exactly where to cut safely.
Connecting strips is just as easy. You just need the right connector and a bit of care with polarity.
Get this wrong, and your strip may not light up at all. Get it right, and you can build a lighting setup that fits your exact space.
This guide walks you through every step. You will learn where to cut, how to connect strips correctly, and which mistakes to avoid.
We will cover voltage matching, connector types, and polarity rules too. By the end, you will feel confident cutting and connecting LED strips like a pro.
Let’s get started.
In a Nutshell
Here’s a quick summary to keep in mind:
-
Cut only on marked lines. Every strip has a solid or dotted line through the copper pads. This is the only safe spot to cut.
-
Check your connector size first. Connectors come in different widths, like 5mm. Match the connector to your strip before you start.
-
Polarity always matters. Positive must connect to positive. Negative must connect to negative. Mixing these up stops the light from working.
-
Measure twice before you cut. A wrong cut wastes strip length and copper pads. Confirm your measurement before making the cut.
-
Solder-free connectors save time. Many connectors just slide into place. You get a solid connection without any soldering.
-
Voltage must match across sections. Connecting strips with different voltages can damage them. Always check voltage ratings before joining pieces.
-
Corner connectors help with angles. If your setup has turns or corners, these connectors make the job much easier.
Keep these points close by. They cover the most common mistakes and the fixes for each one.
Understanding LED Strip Cut Marks and Copper Pads
LED strips have copper pads along their length. These pads carry the electrical current that powers your lights. You’ll see them as small rectangular shapes on the back or edges of the strip.
The cut marks appear as solid or dotted lines printed directly on the strip. These lines run perpendicular to the strip’s length. They mark the exact spots where you should cut. The lines pass through the center of the copper pads for a reason: this gives you maximum surface area for making connections.
Why this matters is simple. Cutting anywhere else damages the copper pads or leaves them too small. A damaged pad won’t accept a connector properly. Your lights won’t turn on if the connection fails.
Each strip has multiple cut marks spaced along its entire length. This lets you customize your strip to any size you need. Some strips have cut marks every 10 centimeters. Others space them further apart. Check your specific strip’s documentation to find the exact distance.
The copper pads come in different widths depending on your strip type. A standard 10mm wide strip has larger pads than a 5mm strip. This is why connector sizes must match your strip width. Using the wrong size creates a loose or incomplete connection.
Here’s the practical step: Before you cut, trace your finger along the strip and locate every cut mark. Mark the exact spot where you want to cut with a pen. Make your cut straight and clean along that line. Never angle your cut or cut between marked lines.
Understanding these cut marks and copper pads prevents frustration later. You’ll get reliable connections every single time.
Tools and Connector Types You’ll Need
You need several basic tools before you start cutting and connecting your LED strips. Having the right equipment makes the job much easier and prevents damage to your strips.
A sharp utility knife or craft knife is essential. This tool cuts cleanly through the strip material without crushing the copper pads underneath. A regular scissors can work, but a knife gives you better control and precision along the marked cut line.
Soldering iron and solder are important if you plan to make permanent connections. These tools bond wires directly to the copper pads on your strip. A basic 30 to 40 watt soldering iron works fine for LED strip projects. Solder flux helps the metal bond properly and creates stronger connections.
Alternatively, you can use soldering-free connectors. These slide-on or clip-on connectors eliminate the need for a soldering iron entirely. They work by gripping the copper pads without heat or solder, making them beginner-friendly.
Wire strippers remove the plastic coating from wires so you can connect them to your strips. A small pair of wire strippers designed for thin gauge wires works best. You’ll also need a multimeter to check voltage and confirm polarity before connecting sections together.
Corner connectors are specialized connectors designed for angled installations. These help you bend your LED strips at 90-degree angles without cutting or soldering.
Finally, keep a small ruler or measuring tape nearby. Accurate measurements prevent cutting mistakes and wasted strip material. Double-check your measurements before making any cuts, since you cannot reconnect a strip once it’s cut in the wrong place.
Step-by-Step: How to Cut LED Strips Safely
Cutting LED strips safely requires careful preparation and the right approach. Start by measuring the exact length you need, then double check your measurement before making any cuts. This simple step prevents wasting material and ensures your strip fits perfectly in your space.
Locate the cut mark on your LED strip. These marks appear as solid or dotted lines printed on the strip itself. The cut mark always runs through the center of the copper pads. Never cut between the copper pads or away from the marked line, as this damages the strip and prevents proper connections.
Position your strip on a flat, stable surface. Use a sharp utility knife or craft knife for clean cuts. Press the blade firmly along the marked line and cut straight through the entire width of the strip. A single smooth motion works better than sawing back and forth. Make sure you cut completely through all copper pads and the strip backing.
After cutting, inspect your cut edges. The copper pads should be fully exposed and clean. If any plastic debris remains on the copper, gently remove it with a small brush or cloth. This ensures proper electrical contact when you connect your pieces.
Check that both cut ends are straight and even. Uneven cuts make connections difficult and unreliable. If your cut looks crooked, you can make a small adjustment with your knife to straighten the edge.
Keep your cut strips in order. Label them if you’re cutting multiple pieces. This prevents confusion during the connection phase. Store cut strips in a safe place where they won’t bend or get damaged before installation.
Step-by-Step: How to Connect LED Strips Without Soldering
Connecting LED strips without soldering is faster and cleaner than traditional methods. You can use special connectors that grip your strip without any heat or solder needed.
Start by preparing your strip ends. Make sure each end is cut straight along the marked line. Wipe away any dust or debris from the copper pads. Clean contacts help connectors work better and last longer.
Choose the right connector for your strip width. LED strips come in different sizes like 5mm, 10mm, or 12mm. Your connector must match your strip size exactly. A loose fit means poor electrical contact. A tight fit can damage the strip.
Understand connector orientation before inserting. Most connectors have a clear polarity marking. Positive wires or pads connect to positive sides. Negative connects to negative. Reversing polarity stops your LEDs from working or causes damage.
Insert your strip into the connector slot carefully. Push straight in until you feel resistance. The connector’s internal contacts should grip the copper pads firmly. Some connectors use a locking mechanism you push down after insertion.
For strip to strip connections, slide both ends into opposite sides of the connector. Make sure both strips are fully seated inside. Wiggle each strip gently to confirm it won’t slip out.
Test your connection before finishing. Power on your LEDs and check that light displays correctly. If one section stays dark, the connection may be loose or reversed.
Keep connectors protected from moisture. Avoid areas where water or humidity is high. Wet connections can corrode and fail. Use heat shrink tubing or connector covers if needed for extra protection.
Soldering LED Strip Connections for a Permanent Bond
Soldering creates a permanent bond between LED strip sections. This method works best when you need a connection that won’t fail over time or when soldering free connectors aren’t available.
Prepare your strip ends first. Clean the copper pads on both strips with a small brush or cloth. Remove any dust or oxidation. This helps solder flow smoothly and creates a stronger connection.
Heat your soldering iron to the correct temperature. Most LED strip connections require 350 to 400 degrees Fahrenheit. Let the iron warm up completely before you start.
Apply a small amount of solder to each copper pad. Touch the iron tip to the pad for 2 to 3 seconds. Then touch the solder wire to the pad, not directly to the iron. The solder should flow onto the pad smoothly.
Hold the wires or connector leads in place while the solder cools. Don’t move them during this time. Movement can create a weak joint that fails later.
Check your polarity before soldering anything. Positive wire connects to positive pad. Negative wire connects to negative pad. Reversed polarity damages your LED strips.
Let each joint cool for at least 30 seconds before testing. Some people use heat shrink tubing over soldered connections for extra protection.
Test your connection immediately. Power on your LED strips and check that lights appear on both sections. If one section stays dark, you likely have a polarity issue or a cold solder joint.
Soldered connections are permanent, so double check everything before you apply heat. This method takes longer than soldering free options but provides excellent durability for permanent installations.
Matching Polarity, Voltage, and Connector Orientation
Getting the polarity, voltage, and connector orientation right is essential for your LED strips to work properly. Mistakes here cause your lights to fail or not light up at all.
Polarity matters most. Every LED strip has a positive side and a negative side. Your connector must match these correctly. Positive connects to positive, and negative connects to negative. If you reverse this, your lights won’t turn on. Look for markings on your strip. Most strips show a plus sign (+) and minus sign (−) near the copper pads. Your connector has matching markings too.
Voltage must stay consistent. All your LED strips need the same voltage rating. If one section is 12 volts and another is 24 volts, they won’t work together. Check the label on each strip before connecting them. Mixing different voltages damages your power supply and strips.
Connector orientation determines success. Each connector type fits only one way. The connector slot matches the strip width. Push your strip straight into the connector until it sits flush. Don’t force it at an angle. The connector should feel snug but not require excessive pressure.
Before you power on your lights, do a quick visual check. Look at the connector from the side. The strip should sit evenly inside without gaps. Verify the polarity markings align on both sides of the connection.
Take your time with these three elements. Correct polarity, matching voltage, and proper orientation prevent frustration and equipment damage. Your LED strips light up beautifully when everything connects the right way.
Common Mistakes to Avoid When Cutting and Connecting
Cutting and connecting LED strips seems simple, but small mistakes can ruin your entire installation. Understanding what to avoid saves time and frustration.
Cutting at the wrong location is the most common error. Your LED strip has marked cut lines for a reason. These lines run through the center of the copper pads. Cut anywhere else and you damage the circuit. Always measure twice before making your cut. A straight cut along the marked line ensures proper connections later.
Using the wrong connector type causes immediate problems. Connectors come in different widths to match your strip size. A 5mm connector won’t fit a 10mm strip properly. Check your strip width before selecting connectors. Mismatched connectors create loose, unreliable connections.
Reversing polarity is another frequent mistake. Positive must connect to positive, and negative to negative. Swapped polarity won’t break your strips, but they simply won’t light up. Mark your strips clearly before connecting multiple sections.
Ignoring voltage consistency causes performance issues. All connected sections must have the same voltage rating. Mixing 12V and 24V strips creates uneven brightness or complete failure. Check voltage markings on every strip before assembly.
Poor connector orientation wastes your efforts. Each connector type fits only one way. Forcing a connector in the wrong direction damages both the connector and strip pads. Insert connectors slowly and feel for natural resistance. The connection should slide in smoothly without forcing.
Skipping the test phase means discovering problems too late. Test connections immediately after assembly. Power on your lights and verify all sections light up evenly. Catching issues early prevents complete reinstallation later.
Take your time with each step. Proper technique the first time beats rushing and fixing mistakes afterward.
Troubleshooting Connection and Lighting Issues
When your LED strips don’t light up after connection, start by checking the basics first. Power is the first thing to verify. Make sure your power supply is plugged in and switched on. Look for indicator lights on the power adapter itself.
Next, inspect your connections visually. Loose connectors are a common culprit. Push each connector firmly into place until you hear a click or feel resistance. Wiggle the connector gently to ensure it’s seated properly.
Check your polarity immediately. Positive and negative wires must match correctly. If one section lights but another doesn’t, you likely reversed the polarity on that section. Trace the positive wire (usually red) and negative wire (usually black) through your entire setup.
Test each section separately if possible. Disconnect one strip at a time and power on to identify which section has the problem. This narrows down whether the issue is with the strip itself or the connection point.
Examine the copper pads where you made your cut. Corrosion or dirt can block electrical flow. Gently clean the pads with a soft cloth if they look discolored or dusty.
If you soldered your connections, check for cold solder joints. These look dull instead of shiny and don’t conduct electricity well. A cold joint needs reheating or resoldering.
Voltage mismatches cause dim or flickering lights. Confirm all your strips have the same voltage rating printed on them. Mixing different voltages creates performance problems.
Finally, test with a different power supply if available. Sometimes the power adapter fails silently. Swap it out to rule out this possibility. If lights work with a different adapter, your original power supply needs replacement.
Final Thoughts
Cutting and connecting LED strips does not need to feel hard. With the right approach, anyone can get clean, working results.
Always cut on the marked lines. This one habit prevents most connection failures right from the start.
Remember that preparation matters more than speed. Measure twice, check your marks, and confirm your connector type before you make any cut.
Matching connectors to strip width is simple once you know the size you need. A quick check before you buy saves you time later.
Polarity and voltage consistency are the two things that decide if your lights turn on at all. Keep these in mind every single time you work on a new section.
Soldering-free connectors make life easier for beginners. They give you a fast, reliable option without extra tools or skills.
For corners or angled runs, corner connectors solve tricky spots without stressing the strip material. This keeps your installation looking neat and professional.
Every mistake on this list has an easy fix if you catch it early. That is why checking your work as you go makes such a big difference.
Think of each connection point as its own small project. Give it proper attention, and the whole strip will function as one unit.
LED strips reward careful work with long lasting, bright, even lighting. A little patience during setup pays off every time you switch on your lights.
With these basics locked in, you are ready to handle almost any LED project. Cut smart, connect carefully, and enjoy the results of a job done right.
Frequently Asked Questions
Can I cut LED strips anywhere on the strip?
No. You must cut only at the marked lines on your strip. These lines run through the center of the copper pads. Cutting anywhere else damages the circuit and prevents the strip from working. Look for solid or dotted lines printed on the strip before you make any cuts.
Always measure twice before you cut once. This simple habit saves you from wasting material and starting over.
What connector type should I use?
Match your connector to the strip width. A 5mm wide strip needs a 5mm connector. A 10mm strip needs a 10mm connector. Using the wrong size means the connector won’t fit properly or won’t make good contact with the copper pads.
Check your strip packaging or measure the width yourself. This takes 30 seconds and prevents connection failures.
Does polarity matter when connecting strips?
Yes. Polarity matters completely. Positive must connect to positive. Negative must connect to negative. Reversing polarity stops your lights from working and can damage components.
Look for markings on your strip. Most strips show a plus sign and minus sign near the copper pads. Match these symbols when you connect sections together.
What happens if I connect strips with different voltages?
Your lights will perform poorly. Mismatched voltages cause dim lighting, flickering, or complete failure. All sections in your installation must run on the same voltage. Check your power supply and verify each strip matches that voltage before connecting.
Are soldering free connectors better than soldering?
Soldering free connectors work well for beginners. They require no special tools and create reliable connections quickly. Soldering offers a permanent bond but demands skill and equipment. Choose based on your comfort level and installation type.

DK is the founder and lead writer at Smart Lighting Finds, where he helps readers discover the best lighting products through honest, hands-on reviews and in-depth comparisons. With a deep passion for home improvement and smart technology, DK is dedicated to making every lighting decision easier and brighter for his readers.