How to Add LED Backlighting Behind Your TV?
Do you want to make your TV feel like a movie theater screen? LED backlighting can help you do that. It adds a soft glow behind your TV and makes colors pop on screen.
This simple upgrade also reduces eye strain during late night viewing. Your eyes will thank you after long binge sessions in a dark room.
Many people think this setup is hard to do. The truth is, it only takes a few basic steps and simple tools.
In this guide, we will show you exactly how to add LED backlighting behind your TV. You will learn how to mount the strips, connect the power, and hide the wires for a clean look.
We will also cover common mistakes people make. This includes poor adhesive placement and strips that face the wrong way.
By the end of this article, you will know how to create a stunning ambient light effect. Your TV setup will look more professional and feel more relaxing to watch.
Let’s get started and transform your viewing space today.
In a Nutshell
Here’s a quick summary to help you get started fast.
-
Mount LED strips around the back edge of your TV. Make sure they face the wall, not you.
-
Use adhesive backing to stick the strips in place. Clean the surface first for a strong grip.
-
Add cable ties to secure loose ends. This stops the strips from slipping over time.
-
Connect the power using a USB or HDMI port on your TV. Check your model to see which one it supports.
-
Keep the strips hidden from view. You should only see the glow on the wall, not the light source itself.
-
Avoid common mistakes like dirty surfaces or weak adhesion. These issues cause strips to fall or shift.
That’s it! In just four simple steps, you can create a cool ambient glow behind your screen. It looks great during movies. It also feels easy on your eyes at night. This small upgrade makes a big difference in your viewing space.
What Is TV LED Backlighting and How Does It Work
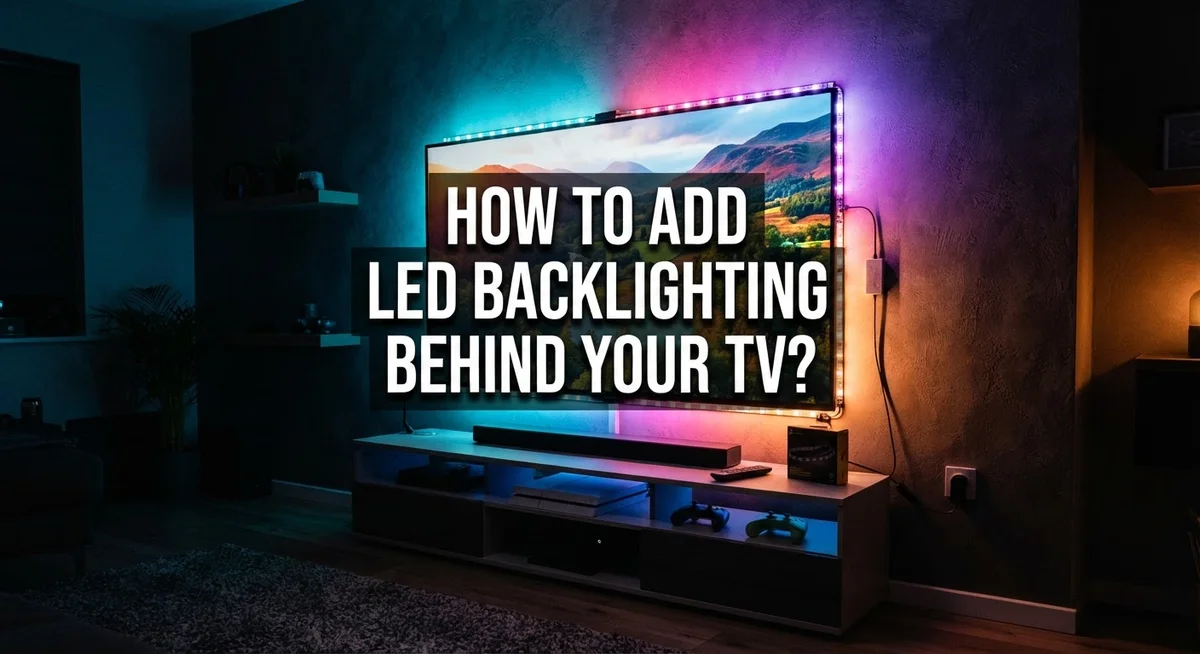
TV LED backlighting creates a soft glow that projects light onto the wall behind your screen. This ambient lighting effect makes your viewing area feel more immersive and cinematic. The light bounces off the wall surface, creating depth and visual interest without shining directly into your eyes.
The technology works through simple LED strips positioned along the back edge of your TV. These strips emit colored or white light depending on your preference. The light travels backward, away from you, and illuminates the wall space behind the television.
Why does this matter? The ambient glow reduces eye strain during dark room viewing. Your eyes don’t work as hard when there’s soft background lighting. The contrast between your bright screen and the dark room becomes less harsh on your vision.
LED backlighting also enhances the sense of immersion. Movies feel more theatrical. Games appear more engaging. Sports broadcasts gain extra visual drama. The light creates a halo effect that makes your TV seem larger and more prominent in the room.
The system works through low voltage power connections. Most LED strips draw minimal electricity, so they won’t significantly impact your power bill. You control brightness and color through a remote or mobile app, depending on your setup.
Installation is straightforward. The strips adhere to clean surfaces using built in adhesive backing. Cable ties keep everything secure and prevent shifting. Power connections plug into USB ports or HDMI outlets on your TV itself.
The key to success is positioning the strips correctly. They must face the wall, not toward you. Proper placement ensures the light effect reaches the wall surface and creates that desired ambient glow. This simple positioning makes all the difference in achieving professional looking results.
Benefits of Adding Backlighting to Your TV Setup
LED backlighting transforms your viewing experience in several meaningful ways. The ambient glow reduces eye strain significantly when you watch in dark rooms. Your eyes work less hard because the soft light behind the screen creates a gentle transition between the bright display and your dark surroundings.
This setup enhances your sense of immersion dramatically. Movies and shows feel more cinematic because the light expands the visual field beyond the screen itself. Your brain perceives a larger, more engaging viewing area. The effect makes action scenes pop and creates emotional depth during dramatic moments.
Better contrast perception is another key benefit. The backlit wall creates a natural frame around your TV. This framing helps your eyes focus on the content while reducing visual fatigue during extended viewing sessions. You’ll notice colors appear more vibrant and details become sharper.
The ambient lighting also improves your room’s overall atmosphere. Instead of a harsh black rectangle in your living space, your TV becomes an elegant focal point. The soft glow adds sophistication to your entertainment area without overwhelming the room.
Practical advantages extend beyond viewing comfort. LED backlighting uses minimal power consumption. The strips generate very little heat, making them safe for continuous use. Installation requires no professional help or complex wiring.
Your viewing comfort increases substantially with this simple addition. Late night entertainment becomes more enjoyable because you’re not straining to see in complete darkness. The gentle illumination creates a theater-like environment in your own home. These benefits combine to make LED backlighting a worthwhile upgrade for any TV setup.
What You’ll Need Before You Start
Before you start installing LED backlighting, gather the right materials and tools. Having everything ready makes the process smooth and fast.
LED strips are the main component you need. Choose strips that fit your TV size and match your preferred light color. Most modern strips come with adhesive backing already attached, so you don’t need extra glue.
You’ll need power supplies to run your lights. Some strips connect directly to USB ports on your TV. Others use HDMI connections or separate power adapters. Check your TV’s available ports before purchasing strips.
Cable ties or velcro straps help secure the strips in place. These prevent your strips from slipping or falling behind the TV over time. They keep everything organized and hidden from view.
A clean cloth or rubbing alcohol prepares surfaces for adhesive attachment. Dust and dirt reduce how well the adhesive sticks. Cleaning takes just a few minutes and makes a big difference in installation success.
A measuring tape helps you plan strip placement. Measure your TV’s width and height to determine how many strips you need. This prevents buying too much or too little material.
Scissors or a utility knife cuts strips to the right length. Some strips come in one long piece that needs trimming for corners. A clean cut ensures neat installation.
Optional tools include a level to ensure strips sit straight. This matters most if you want perfectly aligned lighting. A small flashlight helps you see behind the TV while working.
Gather everything before starting. This saves time and frustration during installation. You won’t need to stop halfway through to find missing items.
Step-by-Step Installation Guide
Start by turning off your TV and unplugging it from the wall. Safety comes first when working with electrical components. Allow the device to cool for a few minutes before you begin.
Next, measure the back perimeter of your TV frame. Use your measuring tape to determine exactly how much LED strip length you need. Add a few extra inches to your measurements for corners and connections.
Clean the back surface of your TV thoroughly with a clean cloth or rubbing alcohol. Dirt and dust prevent adhesive from sticking properly. Let the surface dry completely before proceeding.
Cut your LED strips to the correct length using scissors or a utility knife. Most strips have cut lines marked at regular intervals. Make precise cuts so pieces fit together seamlessly around your TV’s edges.
Peel back the adhesive backing on your first strip section. Position it along the top back edge of your TV frame, ensuring it faces toward the wall behind your screen. Press firmly for several seconds to secure it in place.
Continue this process around all sides of your TV. Work slowly and press each section down completely. Use cable ties to add extra security at connection points and corners.
Connect your LED strips to a power source once all pieces are mounted. Most modern systems use USB or HDMI connections. Check that your power cable reaches a nearby outlet or port without stretching.
Test your lights to confirm they work correctly. Adjust brightness or color settings using your remote control if your system includes these features. Step back and verify that the strips remain hidden from your viewing angle while light projects onto the wall behind your TV.
Proper Mounting and Placement Tips
Proper placement makes the difference between professional results and visible mistakes. The LED strips should mount on the back of your TV frame, facing toward the wall behind it. This positioning keeps the lights completely out of your sight while projecting a soft glow onto the surface behind your screen.
Start by identifying the best mounting surface on your TV’s back panel. Look for a flat, smooth area where the adhesive will grip securely. Avoid curved sections or areas with vents, as strips won’t stay attached to these spots. The back edges of your TV frame work best for most models.
Clean the mounting surface thoroughly before applying strips. Dust, fingerprints, and residue prevent adhesive from bonding properly. Use a clean cloth or rubbing alcohol to wipe the area. Let it dry completely before peeling back the adhesive backing on your LED strips.
Position your first strip along one edge, pressing firmly as you go. Work slowly and avoid wrinkles or air bubbles. Use cable ties every 6 to 8 inches to secure the strips in place. This extra step prevents slipping, especially if your TV sits at an angle or in a warm room where adhesive weakens over time.
Keep strips hidden from direct view. If you can see the LED lights when sitting in your normal viewing position, reposition them further back. The goal is ambient light reflecting off the wall, not visible light sources.
Check that all strips align with your TV’s edges. Uneven placement creates awkward shadows and ruins the effect. Take time to adjust before finalizing connections. Proper mounting ensures your backlighting setup looks intentional and polished.
Common Mistakes to Avoid During Installation
Installing LED backlighting behind your TV requires attention to detail. Several common mistakes can ruin your final result. Learning what to avoid saves you time and frustration.
Visible LED strips top the list of installation errors. Your strips should hide completely behind the TV. If you see the lights when sitting in your normal viewing position, reposition them immediately. The glow should appear on the wall only, never directly visible to your eyes.
Dirty surfaces cause adhesive failure. Many people skip cleaning the mounting area. Dust, fingerprints, and residue prevent the sticky backing from gripping properly. Use a clean cloth or rubbing alcohol on the back of your TV before applying strips. Wait for the surface to dry completely.
Loose cable ties create another common problem. Strips slip down the TV when not secured tightly. Use multiple cable ties along each section. Cinch them firmly but avoid crushing the strips themselves.
Improper power connections lead to non functioning lights. Double check your power source matches your LED strip type. Some strips use USB connections while others use HDMI outlets. Verify compatibility before installation. Keep power cables organized and hidden from view.
Uneven strip placement affects the final appearance. Measure twice before applying adhesive. Ensure strips follow the TV’s edges consistently. Gaps between sections look unprofessional and uneven.
Forgetting to test before final assembly wastes your effort. Connect your lights and verify they work before securing everything permanently. This catches power issues early.
Rushing the installation causes most mistakes. Take your time with each step. Proper preparation prevents problems. Your patience produces professional results.
Troubleshooting Common LED Backlighting Issues
LED backlighting can stop working for several reasons. The most common issue is a loose power connection. Check that your USB or HDMI cable sits firmly in its outlet. Sometimes the connection wiggles loose over time, cutting off power to your strips.
Another frequent problem involves strips that flicker or dim unexpectedly. This usually means your power source doesn’t supply enough energy. If you connected multiple strips to a single outlet, try using a separate power adapter for each section. Some strips draw more power than others, so this simple fix often solves flickering issues.
Adhesive failure causes strips to fall off the TV. This happens when you applied strips to dirty or dusty surfaces. The adhesive loses grip over time. Remove the fallen strip and clean that area again with rubbing alcohol. Let it dry completely before reapplying.
Uneven lighting or dark spots indicate poor strip placement. Make sure each section connects properly to the next. Check for gaps between strips where light doesn’t project smoothly onto your wall. Reposition sections as needed to create continuous illumination.
If only part of your strip works, you may have a damaged section. Test each strip individually by connecting it separately to power. This identifies which section failed. Most LED strips use replaceable segments, so you can swap out the broken piece.
Color issues like one strip showing a different shade than others suggest connection problems. Verify all strips connect to the same power source and control system. Inconsistent power delivery creates color variations.
Finally, test your setup before final installation. This prevents discovering problems after everything is mounted. Power on your strips in daylight to spot issues easily. Catching problems early saves time and frustration.
Maintaining and Caring for Your LED Strips
Your LED strips need regular care to keep working well. Clean them every month to prevent dust buildup. Use a soft, dry cloth and gently wipe the light surface. Never use water or cleaning liquids on the strips themselves.
Check your connections regularly. Make sure the power cable stays firmly plugged into your USB or HDMI port. Loose connections cause flickering or complete power loss. Wiggle the cable gently to confirm it sits snugly.
Inspect the adhesive backing monthly. Press down any edges that start lifting away from your TV. If adhesive fails completely, you can use sticky squares to reattach the strip. Clean the mounting surface first with a dry cloth.
Examine your cable ties every few months. Tighten any that have loosened over time. Loose ties let strips slip out of position and create uneven lighting. Replace damaged ties immediately.
Monitor your lights for color changes. If some strips show different colors than others, check all connection points. Loose connections often cause color inconsistencies between sections.
Test your LED system once monthly. Turn them on and look for flickering, dark spots, or areas where lights don’t work. Early detection prevents bigger problems later.
Keep your TV area well ventilated. LED strips generate minimal heat, but good airflow helps them last longer. Avoid placing objects directly in front of or behind the strips.
Store your spare supplies properly. Keep extra sticky squares, cable ties, and a soft cloth in a drawer near your TV. Quick access means you can fix problems immediately.
Regular maintenance takes just minutes but extends your LED backlighting lifespan significantly. Small preventive steps save you from complete strip replacement later.
Final Thoughts
Adding LED backlighting behind your TV is a simple project. You do not need special skills or tools. Just follow the steps in order.
Preparation makes the biggest difference. Clean your TV surface first. Measure your TV edges before you buy strips. This ensures a snug fit.
Take your time during installation. Rushing leads to mistakes like crooked strips or weak adhesive. A careful setup saves you from redoing the work later.
Remember that placement matters most. Strips should face the wall, not your eyes. This creates that soft glow effect without any glare.
Testing before final assembly saves time. Turn on your lights before you tuck away every cable. This helps you catch problems early.
Your new backlighting setup offers real benefits. It reduces eye strain during long movie nights. It also adds a nice glow to your room.
Many people notice their shows feel more immersive with this lighting. Colors on screen seem to pop more against the ambient glow. Your viewing space feels cozier too.
Maintenance keeps your system working well for years. A few minutes each month protects your investment. Small checks prevent big problems down the road.
Think of this project as a simple upgrade. It does not require rewiring your home or hiring help. Anyone can complete this in under an hour.
The result is worth the effort. Your entertainment space gets a modern touch. Friends and family will notice the difference right away.
Start with quality materials and clean surfaces. Follow each step without skipping ahead. Your patience during setup pays off with lasting results.
Enjoy your upgraded viewing experience. This small change brings a big visual reward every time you turn on your TV.
Frequently Asked Questions
Do LED backlights work with all TV sizes?
Yes, LED strips work with most modern TVs. You can find strips in various lengths to fit your screen. Smaller TVs need shorter strips, while larger screens need longer ones. Most strips come in customizable segments that you can cut to match your TV’s dimensions. The key is measuring your TV’s width and height before purchasing.
What power source do LED backlights need?
Most modern LED backlights connect through USB or HDMI ports. Some models plug directly into wall outlets. USB-powered strips are popular because your TV likely has available USB ports. HDMI-connected strips sync with your TV’s power, turning on and off automatically. Check your specific strip’s requirements before installation.
Can I install LED backlights on a curved TV?
Installation on curved TVs is possible but requires extra care. Use adhesive backing instead of sticky squares for better contact on curved surfaces. You may need more cable ties to keep strips secure along the curve. Test the strip placement before applying permanent adhesive. Curved surfaces create challenges, so work slowly and check your progress frequently.
How do I fix strips that keep falling off?
Strips fall off when adhesive fails. Clean your TV’s surface thoroughly with a dry cloth before applying strips. Remove dust, fingerprints, and residue completely. Apply the strip slowly, pressing firmly along the entire length. If strips still slip, use cable ties as backup support. Replace the adhesive backing if it loses stickiness over time.
Will LED backlighting damage my TV?
No, LED strips don’t damage TVs when installed correctly. The strips mount behind your TV, not on the screen itself. They generate minimal heat and draw little power. Proper installation means no contact with your TV’s electronics. Your TV remains completely safe throughout the process.

DK is the founder and lead writer at Smart Lighting Finds, where he helps readers discover the best lighting products through honest, hands-on reviews and in-depth comparisons. With a deep passion for home improvement and smart technology, DK is dedicated to making every lighting decision easier and brighter for his readers.